1.1
General
This manual describes how
to
use FesaWin for Finite Element Analysis (FEA).
The Manual is divided in
four
chapters.
Chapter 1,
INTRODUCTION
This chapter will give the
user
a general description of FEA and FesaWin, and some technical
information
on the available elements and numerical method used.
Chapter 2, CONTROLS
To be able to work with the
program, the user needs to know how to communicate with the program.
Read
this chapter or use it as quick reference.
Chapter 3, CREATING
AND ANALYZING
A MODEL
This chapter will tell you
how
to built a model and how to analyze and post-process it.
Chapter 4, Element
description
Here all elements are
described.
The different controls of
the
program are referred to as follows:
-
Main menu [File,save…]
-
Button <left mouse
button>
-
Frame or Form Title
-Title-
To get a general
idea on
how FesaWin works run the built-in model building and analyses
demonstration.
Start FesaWin, click on 'Info' and 'Run demo', [Info, Run demo...]
.
1.2
Description
of Finite Element Analysis
The Finite
Element method
is an approximate numerical method in which an arbitrary shaped
structure
is divided up into small elements of various shapes, sizes and types
which
are assembled together to form an approximate mathematical model. In
this
method, a large number of equilibrium equations are formulated which
are
solved to obtain stress and displacement distributions.
In order to do
this,
the engineer has to prepare the mathematical model and data which
consists
of model co-ordinates, material properties, loading and constraint
conditions
and types of elements adopted.
1.3
Description
of FesaWin
FesaWin is a
Linear Static
Finite Element stress analysis program, which includes modeling,
analyzing
and post-processing.
In FesaWin a
model is
defined with the following components:
1) Elements
2) Nodes
3) Element property
groups
4) Boundary condition
The FesaWin
interface
also includes Graphical elements to help to built the model.
Results of an
analysis
are presented in terms of:
1) Stresses
2) Displacements
The program can
handle
more multiple loadcases and load combinations.
The Graphical
pre-processor
enables the user to define a model by simple mouse clicks and/or by
direct
entering co-ordinates. There is also a numerical interface available
taht enables the user to direct enter coordinates, element definitions
and other data.
The basis of
FesaWin
is that what you see is what you have. Elements need to be placed by
the
user either by direct placement of single elements or by generating
patches
from graphically defined surfaces.
Modeling can start
by
dividing the structure into several four or three sided patches using
graphical
lines or circles. When this is ready the patches can be meshed with
elements.
These elements are assigned to a group. Each group of elements has one
set of material and element properties. When this is done, the
constraint
condition should be applied by fixing some of the nodes of the model.
Finally
the required loadcases are created and nodal loads, element loads or
extra
masses are defined for each loadcase.
Note: it is very
important
for the numerical solver of the equations that rigid body movements of
the model are constraint. If not properly constraint the solver will
stop
and give you the following message: "The construction has a Mechanism".
The analysis can
be started.
The model will be solved and the results are written in the database
for
each loadcase.
After the
analysis, load
combination can be defined which are constructed from the previously
defined
loadcase. Each loadcombination can be reviewed graphically or written
into
a report file. Loadcombinations can be changed and modified without
rerunning
the analysis.
The results of
the whole
model or a selection of elements can be visualized by contour plots of
the stresses and deformations.
1.4
Technical
Information
1.4.1
Elements
The following elements
are available:
BARD
Two
Nodal Axial truss element
BEAM
Two Nodal Beam Bending Element
TRIM
Three Nodal Membrane Element
QUA4D
Four Nodal Membrane Element
QUARD
Four Nodal Rectangular Membrane Element
PLARD
Four Nodal Rectangular Plate bending Element
TPLRS
Four Nodal Rectangular Stress Based Thick Plate bending Element
QUARS
Four Nodal Rectangular Stress based Membrane Element
SPRING
One node user defined Flexible support element
The following
table presents
the Degrees of Freedom (DOF) of the FesaWin elements:
| Name |
Nodes |
2-D Analysis |
3-D Analysis |
| |
|
Local DOF |
Global DOF |
Local DOF |
Global DOF |
| BARD |
2 |
x |
x y |
x |
x y z |
| BEAM |
2 |
x y rz |
x y rz |
x y z rx ry rz |
x y z rx ry rz |
| TRIM |
3 |
x y |
x y |
x y |
x y z |
| QUA4D |
4 |
x y |
x y |
x y |
x y z |
| QUARD |
4 |
x y |
x y |
x y |
x y z |
| PLARD |
4 |
Not Valid |
Not Valid |
x y z rx ry |
x y z rx ry rz |
| TPLRS |
4 |
Not Valid |
Not Valid |
x y z rx ry |
x y z rx ry rz |
| QUARS |
4 |
x y |
x y |
x y |
x y z |
| SPRING |
1 |
|
x y (rz) |
|
x y z (rx ry rz) |
Table 1.4.1
Element Degrees
of Freedom
Chapter
4 presents the full description of the elements.
The elements
local axis
are defined as follows:
The order in
which the
nodes of an elements are defined determine the local axis of that
element.
The
axis system is defined as follows:
-
The X-axis is
defined from
node 1 to node 2 for all elements types.
-
For three or
four nodal
finite elements the z-axis is pointing away from the viewer if the
nodes
are defined clockwise. The Y-axis is defined using the right hand rule.
-
For line
elements the local
Y-axis is perpendicular to the global x-y plane. If the element x-axis
is paralel to the global z-axis, than the element local y-axis is
parallel
to the global y-axis.
1.4.2 Stress
Convention
Line
element
stress convention:
Sx     Axial stress (tension is positive)
Sby    Bending stress  around local y-axes (Positive when outer fiber in local z-direction is in tension)
Sbz    Bending stress around local z-axes (Positive when outer fiber in local y-direction is in tension)
Sxy    Shear stress x-y plane
Sxz    Shear stress x-z plane
Stx    Tortional shear stress around x-axes
Finite Element stress convention:
Sx     Membrane stress x-direction (Positive for tension)
Sy     Membrane stress y-direction (Positive for tension)
Sbx    Bending stress around local x-axes (Positive when outer fiber in local z-direction is in tension
Sby    Bending stress around local y-axes (Positive when outer fiber in local z-direction is in tension
Sxy    Shear stress x-y plane
Syz    Shear stress y-z plane
Sxz    Shear stress x-z plane
Stz    Shear stress x-y plane for plate elements due to bending
Combined stress formula
Combined stress has been based on the Von Mises formula, which is a yield criterion.
For line elements the combined stress is calculated at the for corners of a square cross section, and
the highest is reported.
For Finite Elements (Membrane and plate bending) the combined stress is calculated at top and the bottom
of the element, and the hightes is reported.
The following formula is used:
sc = (SX ^ 2 + SY ^ 2 + SZ ^ 2 - SX * SY - SX * SZ - SY * SZ + (SXY ^ 2 + SXZ ^ 2 + SYZ ^ 2) * 3) ^ 0.5
1.4.3 Files
The following
program
files are used:
Fesawin.exe
Finite Element analysis Pre and Post Processor
FesaWin.ico
Icon
Fesawin.htm
User manual readable with internet Browser
Eltyp.dat
Element data file
Eldes.dat
Element description file
Plat.elm
Plate element data file
Matsol.exe
Model Solver (Can also run without Fesawin)
Matsol.ico
Icon
License.dat
License agreement Code
Decmem.dat
Memory settings
Defaults.dat
Saved program setting
Section.dig
Digital database with section property data
Name.obj
Object file containing definition of a standard object
The following model
files
are used:
Root.tek
Model file with nodal co-ordinates, element definition and view settings
Root.mlt
Group file containing all the group; data material and element data
Root.gra
contains the graphic element definitions
Root.vpl
The constraint
Root.knk
The applied nodal loads
Root.ell
The applied element loads
Root.lcd
Loadcase information
Root.lco
Loadcombination information
Root.rot
Element Local Axis definition
The following
analysis files
are used:
Root.DAT
Geometrical data file
Root.MAT
Upper triangle of unconstrained stiffness matrix
Root.MAS
Nodal Mass data
Root.EMS
Element Mass Data
The following result
files
are used:
Root.RVP
Displacement data
Root.KRT
Reaction force data
Root*.rpt
Analysis report file
Finite
Element stresses;
Root.NSR
Global Nodal stress data
Root.NSA
Global Nodal stress average plot file
Root.RSA
Global Nodal stress average data
Root.NSL
Local Nodal stress data
Root.NLA
Local Nodal stress average Plot file
Root.RLA
Local Nodal stress average data
Line Element
stresses
Root.LES
Local nodal stress report
2.0
Controls
This chapter
presents
all the controls the user has over the program.
Figure 1 presents the
look of
the program interface. The interface is divided in a main menu, the
views,
the command line, the status line, the snap button and the selection
box.
The three fields next to the selection box are used for the x, y and z
co-ordinates of a selected point. Each view has scroll bars, a zoom in
<+> and zoom out <-> button, and an autoscale button
<Auto> to
fit the complete model into the view.
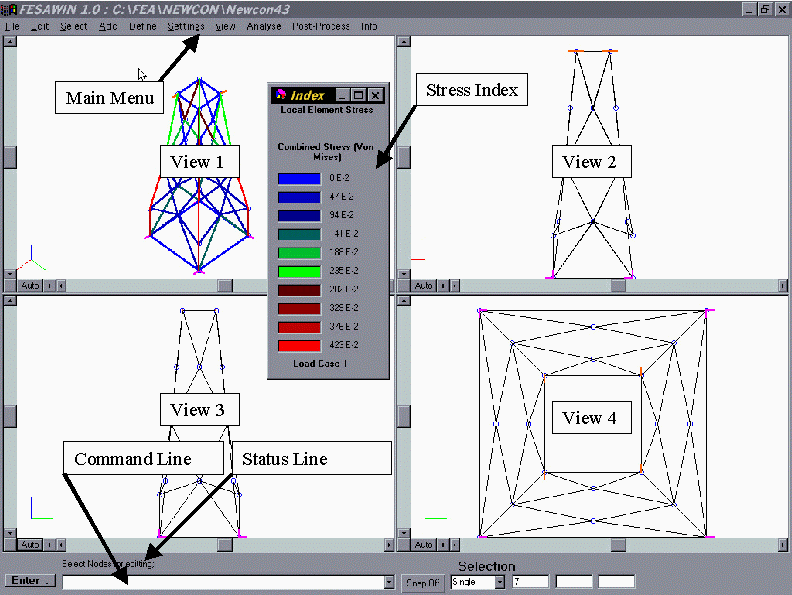
Figure 1:
User Interface
of Pre and Post-Processor.
The main program controls
are:
Mouse actions
Main menu
or toolbar
Command line
The next sections describe
these
controls in detail.
2.1 Mouse
and
Key actions
General,
In most cases the mouse
buttons
will do:
-
Left button is select,
do or perform
-
Right Button gives
context sensitive
pop-up menu
-
<ESC> is deselect,
stop or go
back
-
<Enter> will stop
selecting and
switch directely to the move mode
The mouse action depend on
the active
mode of the program. At the status line, which is located at the left
bottom
of the main window, the model and the object on which the mode works is
displayed.
Select mode
By default the program is in
the select mode. What you select, is defined by the check marks on the
selection
menu .
During editing
and adding
objects it is important to realize what the active selections are. Some
times when you want something to happen and it does not work, check the
active selections, as this may be the source of your trouble.
How you select it, is
defined by
the SELECTION box at the bottom of the screen. The following methods
are
available:
-
Single
:
Each item is selected by clicking on it
-
Window
:
All items inside the window are selected
-
Group
:
All items within one group are selected
-
All
: All items are selected
When the selection method is
"Single",
pointing at the objects and clicking with the <left mouse button>
does
the selection of the node or element.
When the selection method
is
"Window", clicking once with <left mouse button> for the first
corner
of the window and another time for the opposite corner does the
selection
of the nodes and elements. Do not drag the window.
When the selection method
is
"Group", clicking on one element which is part of the group of elements
that needs to be selected does the selection.
It is allowed to switch
between
selection methods during one selection session.
The following table
presents
the possible selection methods per item:
Table 2.1 Possible
Selection
combinations
| |
Nodes |
Elements |
Graphics |
| Single |
+
|
+
|
+
|
| Window |
+
|
+
|
+
|
| Group |
|
+
|
|
| All |
+
|
+
|
+
|
An item can be selected
with
<Left mouse Button>. Click <Right mouse Button> once to
stop selecting
and to select an option from the pop-up menu.
To deselect a selection
do <ESC>
several time.
Clicking on an item,
which is
already selected, will remove that item from the selection list.
Always look at
the Status
Line at the bottom of the screen to see in which mode the program is.
Move mode
When the selection
of
nodes eloements or graphics is ready and move has been selected from
the
pop-up menu, the program will go into the Move Mode.
Selected items
can be
moved either by mouse action or by the "command line".
Move
by mouse
action.
A selection can be
moved
by defining a reference node and a location to move to. All selected
items
will be moved by the vector spanned by the reference point and move to
point. Look at the Status Line at the bottom of
the
screen for guidance with this feature.
When Drag/Drop
is enabled
[edit,
drag/drop], nodes can be moved by holding down the <left Mouse
Button>
and dragging the selection to the new location.
The program can be
forced to
snap to the nearest node or graphic point. Use the <Snap on/off>
button
at the bottom of the main window to control the snapping during
editing.
When snap is on and a mouse click is too far from a node, snapping will
not occur.
Move
by Commands.
See
section 2.3.
Add mode
The program is in
the
add mode when one of the items of the Add menu has been selected.
During adding,
existing
nodes or graphics can be used to snap on.
2.2 Main Menu
This chapter describes
the options
of the main menu.
2.2.1 File
[New]
This option will delete the
model from memory and present a new empty work field.
[Open...]
This option will delete an
existing
model from memory and load a new model from disk into the memory of the
program.
[Import Model...]
This option allows you to
import
another model or a CAD drawing and merge it with the current model in
memory.
To import another FesaWin
model
select *.tek in the filetype selection box.
To import a CAD drawing
select
*.dxf in the filetype selection box.
The imported model will
be placed
in the working memory of the current model as a pasted object. This
means
that after importing, the new part is still selected and can be moved,
scaled, mirrored or deleted as any selection of elements and nodes.
[Save...]
This option will save the
current
model in memory on disk.
[Print...
The print option will send a
plot of view 1 to the printer.
[Save Settings]
Program and view settings
will
be saved on disk in the file; defaults.dat .
[Get Settings]
To retrieve the saved
settings
[Model
Size]
This option presents a form
that enables the user to define the maximum memory size that the
program
should reserve. These settings can be changed during a session. It is
advised
to check the declared sizes regularly as the program will crash when
the
model becomes bigger than the reserved memory allows. Use Main Menu: [INFO,
Model Info...] to review the memory use of your model.
Do not reserve too much
space
as this could reduce the speed of the program.
[Exit]
This will exit the Fesawin
session.
2.2.2 Edit
[Undo]
The undo option is only
available
to undo moving of Finite Element nodes when they are still selected.
[Delete]
This option will delete the
selected FE elements, nodes or graphic elements.
[Cut]
This option will copy and
delete
the selected FE elements, nodes or graphic elements.
[Copy]
This option will copy the
selected
FE elements, nodes and graphical elements.
[Paste]
This option will
paste
the copied elements and nodes and place them at the same locations as
where
they were copied from. As the pasted elements and nodes are still
selected
they can be moved by mouse action or by entering move commands at the command
line .
To deselect and accept
the pasted
elements and nodes press <ESC>. When "check node merge and
element merge"
is on, see [SETTINGS, OPTIONS…] ,
each node and element from the selection will be checked and doubles
will
be deleted.
[Drag/Drop]
When this option is Checked,
graphic nodes and FE Nodes can be dragged and dropped.
Note: Only begin and end
nodes
of the graphic elements can be dragged.
[Modify
Selection]
This option can be used to
modify
or edit the properties of the selected items.
It is advised to select
one type
of item for modification. Depending on the active selection the
following
modification can be done:
Modify
Finite Elements:
This option presents a form,
which allows modification of the group name and/or element type of a
selection
of elements. The
definition
of the local co-ordinate system can also be modified on this form.The
local coordinate system can be rotated around the local z-axis or
mirrored
in the local x-y plane.
-
First select the
elements which
should be modified.
-
Do: [EDIT,
MODIFY SELECTION…]
-
Set the selection
criteria "element
type" and "group name". Only the elements which meet these criteria
will
be modified.
-
Define the change
action to be performed
in the lower half of the form by choosing an option in the "element
type",
"group name" boxes or one of the axis modification options.
-
When ready press
<APPLY> and
the change will be performed.
Modify
Graphic Elements.
This option presents a
form,
which allows modification of the graphic element properties of one or
more
graphical element. The fields on the form are described as follows:
"Element ID"
This field presents the
identification
number of the selected graphical element. If more than one graphical
element
is selected, this field will be a drop down box. The drop down box
allows
you to select one of the selected elements or the whole selection.
"Element Type"
This field can not be
modified
and presents the type of the selected element, which could be:
-
Line
-
Arc
-
Circle
-
Various (This
appears when different
types of graphics are selected)
"Radius" or "Length"
This input field allows
you
to modify the radius of a circle segment or the length of a line
element.
The selected end node
of the
line element will move when length is changed.
The beginning, end
point and
plane in which the circle lies will not change.
Note: if the is
radius is chosen
20 times larger than the distance between the begin and end node, the
element
type will be changed to line. This is done to avoid confusion on the
definition
of the circle plane.
'Various' will appear
in this
field if multiple elements are selected with different radius
"Nodes"
This field controls the
number
of nodes on the graphical element. Minimum value is two, which are the
beginning and end nodes. The intermediate nodes on a graphical element
are snapable but can not be moved or edited individually.
'Various' will appear
in this
field if multiple elements are selected with different number of nodes.
"Spaces"
This field does
basically the
same as "Nodes", except that the input is number of spaces between the
nodes, in stead of number of nodes. Minimum value is 1 (one). Relation
with "Nodes" is: "Spaces" = "Nodes" – 1
'Various' will appear
in this
field if multiple elements are selected with different number of spaces.
"Distribution
Factor"
This factor controls the
distribution
of the nodes over the graphical element. The factor is defined by the
ratio
between the first and last spacing between the nodes.
'Various' will appear
in this
field if multiple elements are selected with different distribution
factors.
[Refine Elements]
This options refines
the selected finite elements. Be careful as the refining can not be
undone.
[Numerical
Interface]
This options allows
the user to direct enter the data for the model. The right window can
be used to enter or edit the data. The left part of the window can be
used as reference only.
- All changes are directly
written to the database in the program memory
- To edit dubbel click and
enter new value. Close by <Enter> or clicking on another cell.
- To add a new record,
dubbel click on cell at the NEW line, enter value and close cell.
- Multiple selections is
not yet available
2.2.3 Select
The selection process,
using
the mouse is described in chapter 2.1
This menu option controls
which
items are active for the selection process.
[Nodes]
This option should be
checked
when you want to select Finite Element Nodes.
[Elements]
This option should be
checked
when you want to select Finite Elements.
[Graphic]
This selection allows you to
select graphic elements or nodes for editing.
When checked, graphical
elements
can be selected. To modify a graphical element double click with the
<left
mouse button>, and a form will appear which allows you to modify the
graphic
element or select a graphic and do [EDIT,
MODIFY SELECTION,...] .
[Snap]
This option will toggle snap
on or off.
2.2.4 Add
[Free
Node]
This option enables
the user to place free finite element nodes.
-
Use <left
mouse button>
to place Finite element nodes
-
Use <ESC>
to stop.
-
Direct entering
the co-ordinates
using the command line can also be used
to
place nodes.
[Elements,…]
This option enables
the user to place individual elements.
When selected, a
form
will appear which allows you to choose the element type you want to use
and to which group these elements should
be
assigned.
-
Press
<Add> to start
placing elements.
-
<Left mouse
button> to
place element nodes.
-
<ESC> to
stop placing
elements.
The element nodes
can be
placed by clicking with the mouse in the free space, by clicking on
existing
nodes, (Switch on Snapping !!) or by direct
input
of the coordinates using the command line
.
The order in
which the
nodes of an elements are defined determine the local axis of that
element.
The axis system is defined as follows:
-
The X-axis is
defined from
node 1 to node 2 for all elements types.
-
For three or
four nodal
finite elements the z-axis is pointing away from the viewer if the
nodes
are defined clockwise. The Y-axis is defined using the right hand rule.
-
For line
elements the local
Y-axis is perpendicular to the global x-y plane. If the element x-axis
is paralel to the global z-axis, than the element local y-axis is
parallel
to the global y-axis.
[Mesh]
This option starts
the
mesh generation module.
The first form is
used
to select between 2-D meshes or 3-D meshes.
Note:
3-D solid
meshes are not included in this version of FESAWIN.
The next form
presents the
2-D mesh generator.
The generator
uses graphical
elements as edges to define the borders of the mesh. Before using the
generator
define a closed area using graphical elements with three or four sides.
A side may be constructed from several graphic elements as long as it
is
one closed string.
Activate mesh
generator
- The first field
defines
the mesh type to be generated, the types are:
Quad
Four sided area
which
will be filled by four nodal elements, opposite sides should have equal
number of nodes.
Line
Line which will be
meshed
with two nodal elements.
Transit
Four sided area
which
will be filled by four nodal elements. This option is not available.
- The second field
defines
the element type to be used.
- The third field
defines
to which group these elements should be assigned.
The drawing in
the second
frame shows the order in which the edges should be defined.
The buttons on
the third
frame can be pressed to select the graphical components of the edges.
Each edge may
consist
of more than one graphical element. The order in which the graphics are
selected is not important, but the edge should be continuously.
When all edges
are selected,
the mesh can be generated by pressing <Generate Mesh>. Press
either
<Accept> to accept the proposed mesh or <Reset> to reject.
The generator
is ready to generate a new mesh after <Reset> or <Accept>.
The proposed
mesh is only showed in view 1.
[Object...]
Objects
are predefined models (e.g. beam, plate or tubular), which can be sized
using variables and merged into the model.
<Load
new Object>
This
button will allow the user to load a new object from file. The
extention
of the object file is .obj .
When
the object is loaded, the available parameters which define the object
and the default values are shown on the form.
Modify
the values of the variables by selecting the variable and changing the
value in the edit box below.
<Show
Object>
Press
this botton to show the object.
You
may change the variables and press this button again to see the effect.
<Autoscale>
To
fit the whole model and object into the view press this button.
<Accept>
This
will paste the object into the model at the default location of the
object
and will return you to the edit mode of the program.
The
position and orientation of the inserted object can be changed using
normal
edit functions.
<Cancel>
This
will close this form without merging the object.
[Constraints...]
or [Loads,...]
These options
presents
a form to modify or review the boundary conditions.
The loads menu
option
also allows the user to choose for element loads or nodal loads.
The first frame
controls
which nodes of the selection should be modified. If all nodes of the
selection
should be modified then choose "Selection". If you want to modify or
review
one of the nodes of the selection, select the node from the pull down
box.
Note: The
numerical values
of the boundary conditions are presented, when you select one
individual
node or element from the pull down box.
The second frame
present
six or three fields to enter the values of the boundary conditions. For
constrains the following rules apply:
-
No
constrain : Empty input
field
-
Fixed :
Fill in a 0
-
Prescribed
displacement
: Fill in value of displacement
For loads the
following
rules apply:
-
No Load :
Empty input field
-
Prescribed
load : Fill in
Value of load or mass
If the active
loadcase is
an inertia loadcase than the numerical values will be interpreted as
point
masses.
Loads
can be
defined per loadcase. Loadcases should be defined first before loads
can
be assigned. Use [Define, Loadcases...]to
define the loadcases.
When
<APPLY> is pressed
the boundary conditions of the selected nodes will be replaced by the
entered
values of the input fields.
Constraints
and nodal loads are both defined relative to the global coordinate
system.
Element pressure loads are defined relative to the element coordinate
system.
Do [Settings, Local axis] to see element local coordinate
system.
[Graphics,
line]
This option
activates
the adding line mode. Use <left mouse button> or command
line to define the nodes of the line. By hitting <Enter> a
new line
string can be started. Use <ESC> to stop the adding line mode.
A line is defined
by
one begin and one end node.
To snap on
existing nodes,
switch on the snapping mode and be sure that the active select mode is
correct. Any visible node can be snapped on.
[Graphics,
Circle]
This option activates
the adding circle section mode. Use <left
mouse button> or command line to
define the
nodes of the circle section. By hitting <Enter> a new circle
section
can be started. Use <ESC> to stop the adding circle mode. Note:
a full circle can not be made by one element, you should define two
half
circle sections to define a full circle.
A circle section
is defined
by three nodes that may not coincide. The three nodes span the plane in
which the circle section is situated. The first node is the starting
point,
the second node is the end of the circle segment and the third node
defines
the radius and the plain and lies on the circumferential of the circle
between the begin and end node. Use [Edit,
Modify selection,…] to change the radius of the circle segment.
The third node
can be
selected and relocated by mouse action or command line.
To snap on
existing nodes,
switch on the snapping mode and be sure that the active select mode is
correct. Any visible node can be snapped on.
[Graphics,
Intersection]
This
function will construct an intersection of two non parrallel lines. If
the two lines are not in one plane, than a line will be added at the
shortest
distance between the two line.
[Graphics,
Extend]
This
function will extend one or both lines to the intersection point or the
point at the shortest distance between the two line.
2.2.5
Define
[Group]
This form is used to
define the element group names and properties.
-Group Name-
To define a new
group,
press <Add> and enter the new name in the group name field. After
modifying
the group name field <Update> should be pressed to save the
change.
To delete a group press <Delete>.
The element
groups are
also used as nodal stress average groups. This means that nodal
stresses
averages are calculated per element group.
When "All Groups"
is
selected, any edit will be applied to all groups.
To define Beam cross
sectional properties use <section tool>. This
tool calculates the cross sectional properties of tubulars and several
other beams. Also a database of standard beams is provided. It should
be remembered that only the results of these calculations are saved in
the database. No reference to the database is saved.
-Properties-
The following
properties
are to be defined:
-
E modules :
young modules
of elasticity
-
Poisson ratio :
Contraction
coefficient
-
Specific Mass of
used material.
-
Thickness | Area
: Thickness
for membranes and plate elements, Area for line elements
-
Select : Plane
strain or
plane stress: Valid for membrane elements
-
Local rotation :
Angle between
local z-axis and global z-axis for 3-D beam elements
-
I, W : Cross
sectional properties
of Beam elements on local co-ordinate system
Use <Section
Tool> to
calculate the geometrical properties of various cross sectional area's.
Press
<Update> to
save the new properties. If "All Groups" is selected, values entered in
the property fields will be applied to all groups.
Element
properties of the Spring support element can be defined on this form
after
pressing <Spring>. The 6 x 6 stiffness matrix can be filled out
on this
form. The spring element only uses the properties of this matrix all
other
data of this group are ignored. Other elements will ignore the
stiffness
matrix.
Table
1.4.1 presents the global degree of freedom that should be filled out
for
the spring support element. For instance, if a 2-D analysis is
performed
with only BARD of membrane elements, (Only x and y are included in the
analysis), than the 2 x 2 upper part of the stiffness matrix should be
filled out, see also table 2.2.1. Table 2.2.1 and 2.2.2 presents the
stiffness
matrix entries are used for each type of analysis.
Notes:
Only the upper triangular has to be filled out
The
green entries
are only included in the analysis when a beam bending element is used.
Table 2.2.1
Spring
support matrix for 2-D analysis.
| XX |
XY |
XZ |
XRX |
XRY |
XRZ |
|
YY |
YZ |
YRX |
YRY |
YRZ |
|
|
ZZ |
ZRX |
ZRY |
ZRZ |
|
|
|
RXRX |
RXRY |
RXRZ |
|
|
|
|
RYRY |
RYRZ |
|
|
|
|
|
RZRZ |
Notes:
Only the upper triangular has to be filled out
The
green entries
are only included in the analysis when a beam bending or a plate
bending
element is used.
Table 2.2.2
Spring
support matrix for 3-D analysis.
[Loadcase]
This form will be
used
to define the loadcases.
Loadcase
number and
loadcase name
These fields
presents
the names and number of the defined loadcases. The name of the loadcase
can be changed by entering the new name in the name field and pressing
<update>.
Loadcase
type
This field allows
the
user to choose the type of loadcase required. The following types are
available:
Applied
Loads
This loadcase type
will
allow the user to define nodal loads only. The loads should be defined
using [Add, loads..]
.
Intertia
loadcase;
Acceleration x,y,z
This loadcase type
will
allow the user to define acceleration loads in the global x,y or z
direction.
The acceleration value, as specified in the acc. field, will be used to
calculate nodal loads based on the masses in the model. If "Element
mass
ON" is selected the element specific density, as defined for the
element
groups are included, multiplied with the specified acceleration and
applied
on the model as nodal forces for this loadcase. Additional point masses
can be defined for this loadcase type by using the [Add,
Loads...] option of the main menu.
Intertia
loadcase;
Rotation rx,ry,rz
This loadcase type
will
allow the user to define rotational acceleration loads around the
global
x,y or z axis. The acceleration value, as specified in the acc. field,
together with the specified rotation center, will be used to calculate
nodal loads based on the masses in the model. If "Element mass ON" is
selected
the element specific density, as defined for the element groups are
included,
multiplied with the specified acceleration and applied on the model as
nodal forces for this loadcase. Additional point masses can be defined
for this loadcase type by using the [Add,
Loads...] option of the main menu.
Important Note:
Be consistence with
the units of the model and accelerations of the defined loadcases. Table
3.1 presents examples of consistence stes of units.
After any change
press
<update> to save the change.
2.2.6
Setting
[Colors]
This form allows the
user to change the color settings of the program. To save the color
settings
for a next session, do [FILE, SAVE SETTINGS].
[Font]
This option allows
the
user to set the font properties of the node and element labels. To save
the font settings for a next session, do [FILE, SAVE SETTINGS].
[Scrollbar]
To display the
scrollbars
check this option.
[Global Axis]
To display the
global
axis check this option.
The global axis
are displayed
in the left lower corner of each view. The axis are color marked as
follows:
-
x-axis Red
-
y-axis Green
-
z-axis Blue
[Local Axis]
Check this option to
display the elements local axis systems. The axis are color marked as
follows:
- x-axis Red
- y-axis Green
- z-axis Blue
[Options]
This form allows the
user to set various features of the program.
File & Save
Auto renumber
before saving option can be controlled.
After an analysis,
the
auto renumber option will be switched off automatically. This is done
because
model renumbering can make the analysis results invalid. After an Add
command
from the main menu, renumbering is switched on automatically again
assuming
that the model is changed.
GUI
Several auto-redraw options can
be switched off. This can be usefull when workin with a large model.
Modelling
Option for finite element
moddeling can be controlled.
Hiddenline
The
hidden line options are presented on this form. Here the color, the
intensity and the direction of the light source for shading can be set.
[Symbols]
This form allows the
user to set the size of the symbols used by the program.
Symbols are graphical icons used in the model.
[Toolbars]
This form allows the
user to switch the toolbars on or off.
The toolbars can be dragged using the mouse and placed anywhere on the
screen.
2.2.7 View
[View
Set]
This option shows a
form, which controls the settings of the view.
-View type-
You can chose to
display
only one view or four views at the same time.
<Copy>,
<Paste>
These functions can
be used to copy and paste view settings from view to view.
-View angle-
These fields defines
your view direction regarding the horizontal and vertical plane.
The buttons on this
frame sets four pre-defined view angle settings.
-View point-
These fields defines
the point at which you are looking at through your view. When
<AutoScale>
is used the middle of the model will be set as the viewpoint.
-View settings-
This defines the
scaling
factor and your distance relative to the view point.
The "Unit Vector
Length"
is a value between 0 and 2 which is used to size the graphics of the
boundary
conditions and the scale of the deformed shape plot relative to the
view
size. The view width and height is 10.
<Autoscale>
The autoscale
routine
sets the middle of your model as the view point and sets the scale to
fit
the model in the view.
Click on the
little views
on this form to select another view.
-Define Elements
to view-
Select one of the
following
options:
*
All
Elements :All elements will be shown in the view
*
Group
:Select
one group of elements which should be shown in the view.
*
Selection :Press <Select> and
select
the elements that should be shown in the
view, press <ESC> to stop selecting.
It should be
noted that
Finite Element Nodes which are not connected to an element will not be
visible and can not be selected when a selection of elements is shown.
When <All Elements> are selected also all nodes will be shown.
If you want to
make one
group invisible in a view work as follows:
-
Press
<select>
-
Set selection
method to
"All"
-
Click in the
view to select
all elements
-
Set selection
method to
"Group"
-
Click on an
element of the
group which should be made invisible (This will remove that group from
the selection)
-
Press <ESC>
When ready press
<OK>.
[Redraw]
This options redraws
all views.
[Nodes] ,
[Elements],
…..
This options
controls
if the attributes or objects are drawn.
[Window]
This option will
allow
the user to define a new view window by drawing a rectangular fence
around
a part of the model. The contents of the fence will be the new window.
Follow the instruction in the 'Status Line' (Left Bottom of screen).
[Hiddenline]
Select this option
to
switch-on hiddenline.
2.2.8
Analyze
[Check
Model...]
The check model form
will help the user to find errors in the model. The following check can
be performed:
-
Define elements to check -
Here
you can define which elements should be checked or modified.
-
Check local element axis -
For
the nodal stress average calculation each stress components of adjecent
elements within an element group will be averaged in order to get a
continues
stress field. For a correct stress field it is paramount that the
direction
of the stress component of each element is similar or deviates only a
little.
The larger the angle between local axis of two elements the larger the
error of the averaged stress will be.
This
check will show large differences per local axis by giving diffirent
color
shading to different directions.
Press
the buttons in the frame and check if any discontinuity of the element
shading can be
found
within an element group which indicates that the local axis are not
correctely
defined.
To
correct by hand, select the element and do [Edit, Modify Element..] and
change the definition of that element local axis until it fits better
into
the element group.
To
auto correct use the following two functions:
<Modify>
This
option will change the element definition such that adjecant elements
will
have the smallest difference in local axis direction. This is done by
changing
the order of the element nodes.
<Homogenize
Axis>
This
option will change the local axis definition and will rotate the local
axis such that adjecent element have similar local directions. This is
done by offsetting the axis with an angle such that all local direction
are similar.
Figure
2.1. presents an example of a good defined mesh and a bad defined mesh.
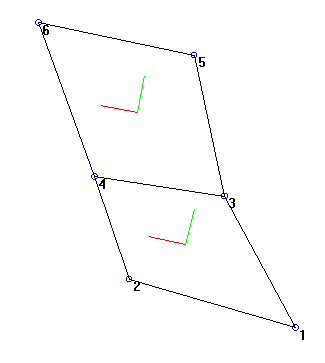
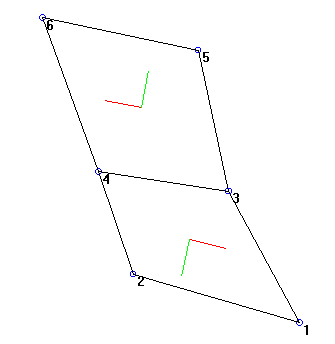
GOOD
BAD
Figure
2.1 Example of good local axis and bad local axis of two adjecent
elements
in a 2-D model.
If
it is not possible to model the local axis correctly it is advised to
assign
the elements to different groups.
[Options..]
This form controls the
analysis.
-General-,
Chose between a 2-D or a 3-D
analysis. If a 2-D analysis is chosen only the x and y co-ordinates are
considered for the analysis.
When "Clear memory before
analysis"
is checked, the memory used by the model is cleared to free RAM for the
analysis. This is advisable when a very large model is to be analyzed.
When a small model is run uncheck this option as the clearing of the
memory
is not needed and will probably take more time than the analysis.
-Pre-processor-,
When "Renumber model nodes"
is checked, the model will be renumber before analysing. Since this
action
takes some time it can be switched off. But one should be aware that if
this option is off and nodes or elements have been added, the node
numbering
could be far from optimal which will enlarge the bandwidth and
consequently your matrix size and solving time drastically.
"Generate Element
Mass
Matrix" can be switched of if no acceleration loadcases are defined.
Before
running an analysis the program will automatically switch this option
on
if any element masses are required for the defined loadcases.
-Solver-,
"Compile Stiffness
matrix"
may be switched off when no changes of the model have occurred since
the
last run. Boundary conditions (Constrains and loads) are not applied to
the saved stiffness matrix, so a rerun with different boundary
conditions
without compiling the stiffness matrix is allowed. If
the model is renumbered the stiffness matrix should always be
recalculated
When "Solve
Displacements"
is checked the compiled stiffness matrix is read from file, the
boundary
conditions are applied and the displacements are solved and written to
file.
-Post-Processor-,
The options on this
frame controls which stresses are calculated using the latest
displacements
found in file.
If "Line element
stresses"
is selected the stresses of all two nodal line elements will be
calculated.
If "Finite
Element stresses"
is selected, the stresses of all three or four nodal finite elements
will
be calculated.
[Analyze]
This menu entry will start
MatSol,
which is the FesaWin Finite Element analyzer. MatSol can also be
started
outside FesaWin, which allows you to continue working on a model while
another model is running. Do not work and run at the same model at the
same time. And do not run more then one MatSol analysis at the same
time
as they may interfere with each other.
For large problems it is
advised
to run MatSol outside FesaWin as FesaWin will continue to use processor
time and thus slow done MatSol.
Note:
If Matsol will be executed outside FesaWin it is advised to run
renumber
within FesaWin first, do [Analyze, Option...] switch on the renumber
option
and switch off all other options, close the form and do [Analyze,
analyze].
That way a optimal node numbering will be set which will minimize the
size
of the global stiffness matrix, which will reduce the execution time of
Matsol significantly.
2.2.9
Post-Process
[Load
combinations...]
This form will be used to
define
and select the load combination.
Load
combination name
This selection box
presents
the names of the defined load combinations. The name of the load
combinations
can be changed by entering the new name in the box and pressing
<update>.
For post-processing the active load combination will be used which is
the
selected load combination in this box.
Loadcase
Name
This selection box
presents
all available loadcases of the model.
Multiplier
This
field present the loadcase multiplier for this loadcase and load
combination.
Change the multiplier and press <Update> to save.
- Equation of
Load Combination:
...." -
This
frame will show the equation of the active load combination as defined
using the multipliers.
After any change press
<update>
to save the change.
[Displacement]
When checked, the deformed
shape
of the active load combination will be plotted. The displacement will
be
scaled relative to the view size using the "Unit Vector Length" value
as
maximum displacement. By changing this value the deformations can be
altered
for clarity, do [View, view set..] .
[Contour
Plot]
When checked, the active
contour
plot of the active load combination will be plotted. To view a
different
loadcombination, use the selection box on the Stress index frame. To
select
the type of contour plot do: [Post-Process,
Option..] .
[Mode
Shapes]
Frequency domain
analysis
is in development.
[Element
Stress]
When checked, the line
element
stresses of the active load combination will be color plotted. To view
a different loadcombination, use the selection box on the Stress index
frame. To select the type of stress component do: [Post-Process,
Option..] .
[Report..]
This entry will activate the
report generator.
Check the reports you
want to
write into your report file and do "Write".
Choose a filename and save
the
report. The report is an unformatted ASCII file. To print the report,
use
another utility to do so.
To browse through the
report
select "View". Select the file with extension .rpt and the browser will
be opened.
[Options..]
This form present the options for post processing.
-Select Contour
Plot
Type-
Filled contour or
contour
lines can be chosen.
-Select data for
contour
plot-
Nodal stresses or
nodal
displacements can be chosen.
-Select Stress Component for post processing -
The following stress components are available:
Direct stresses.
Sx
Sy
Sz
Shear stresses
Sxy
Sxz
Syz
Bending stress around axis
Sbx
Sby
Sbz
Torsion stresses around axis
Stx
Sty
Stz
Combined stress (Von Mises)
VM
-Select stress coordinate system-
This frame allows the user to choose between a local coordinate
system or global system.
It should be noted that for the calculation of local nodal stress
averages it is required that two adjacent elements within the same
element
group should have the same local coordinate system. If not, stresses of
different directions are averaged which will give wrong results. If
local
coordinate systems within a group of elements are not uniform use
global
stresses. The combined stress component (Von Mises)is direction
independent
and will therefore be correct and similar for both local or global.
-Select stress
Type-
This frame allows
the
user to select element nodal stresses or nodal stresses averages. if
element
stresses are selected the nodal stresses of each individual element is
used. The contour plot will not be smooth as the stress field is not
continuos
between elements. This is a characteristic of the displacement based
finite
element method. To smoothen the stress field, the element stresses of
one
node are averages for each connected element and used for post
processing.
Only elements which are from the same group are included to calculate
the
nodal stress average value. This implies that discontinuity of the
stress
field between two element groups can be observed.
-Select
displacement
component for contour plot-
Chose a global
direction
or the x y z displacement which will show the length of the total
displacement
vector in each node.
-Define Elements to Post-Process-
Select one of the following
options:
* All
Elements
:All elements will be shown in the view
*
Group
:Select one group of elements which should be shown in the view.
*
Selection
:Press <Select> and select the elements that should be shown in
the
view, press <ESC> to stop selecting.
-Stress Index Scale-
This options allows the user to control the range of stress
values
to be plotted.
Select <Auto> to plot the full range of stresses found in
the
database of the selected elements
Select <Manual> to define a range of stresses to be
plotted.
2.2.10 Info
[User manual..]
This option displays the
user
manual in ASCII format. It is advised to use your internet browser to
view
the manual. Filename = manual.htm.
[About..]
General information about
FesaWin
can be found here.
[Model
Info..]
This option presents the
size
of the model and the size of the declared space for the different model
arrays. Perform a regular check and declare more space if needed.
Warning;
the program will crash if the model gets greater than declared for!
[License..]
This form presents your
licence
level and allows you to change your license.
[Run Demo...]
This option will start the
demonstration
which will show you how to built a model and perform an analysis.
2.3 Command
line
The command line, located
at
the bottom of the main window, can be used to edit the co-ordinates of
a selection of nodes during editing or moving and to enter the
numerical
values of node co-ordinates during adding of nodes or graphics.
The commands should be
typed
in lower cases and are activated by pressing Enter on your key-board or
the <Enter> button left of the Command Line.
The pull down button at
the right
of the command line shows the previous commands, which can be selected
for re-use.
The following commands
are available.
dx=dx;
dy;
dz
-
to
move the
selected nodes by the vector (dx;dy;dz) relative to the previous or
last
selected location
ax=
x;
y;
z
-
to
move the
selected nodes to the absolute location (x,y,z).
-
To
fix a co-ordinate
use *
.Example:
ax=12
;*
;-5.2
This command will set the x co-ordinate of all selected nodes at 12 and
the z co-ordinate of all selected nodes at -5.2. The y co-ordinates
will
not be changed.
rx=
angle
-
to
ro
tate the selected nodes by "angle" degree around the global X axis
-
Note: Rotations are
performed around
the center point of the selected nodes.
ry=angle
-
to rotate the selected
nodes by
"angle" degree around the global Y axis
-
Note: Rotations are
performed around
the center point of the selected nodes.
rz=angle
-
to rotate the selected
nodes by
"angle" degree around the global Z axis
-
Note: Rotations are
performed around
the center point of the selected nodes.
sc=scx
;scy;
scz
-
to multiply each
co-ordinates of
the selected nodes by the factor scx, scy and scz.
mxy z
-
to mirror the selected
nodes in
the X-Y plane.
-
z
defines the z co-ordinate of the mirror plane.
Note: If z is omitted or z =
* the
center point of the selected nodes is used to define the plane.
myz x
-
to mirror the selected
nodes in
the Y-Z plane.
-
x
defines the x co-ordinate of the mirror plane.
Note: If x is omitted or x =
* the
center point of the selected nodes is used to define the plane.
mxz y
-
to mirror the selected
nodes in
the X-Y plane.
-
y
defines the y co-ordinate of the mirror plane.
Note: If y is omitted or y =
* the
center point of the selected nodes is used to define the plane.
help
-
will show you a short
reminder of
the commands.
First select the
nodes then
type the commands into the command line, (replace the red marked text
by
numerical values), and press <Enter> to activate. Always use
lower case.
Figure 3.2 Four
nodal mesh
(Click on picture to enlarge)
3.3
Defining
boundary condition
When the elements are
placed
the boundary conditions should be defined.
To define the loads
work as follows:
-
First use [Select,
Nodes] to switch to finite element nodes selection.
-
Select all nodes
with equal loads
-
Do: [Add,
Loads..]
-
Select the loadcase
-
Enter the values of
the load components
-
Press <Apply>
-
Review the results
in view 1
-
Press <Ready>
If multiple loadcases are
required,
define the loadcase name and type at
[Define, Loadcase...]
Check the
settings of
[View, Loads,....] if loads are not shown while defined.
To define the
constraints work
as follows:
-
First use [Select,
Nodes] to switch to finite element nodes selection.
-
Select all nodes
with equal constraints
-
Do: [Add,
Constraints..]
-
Enter the values of
the constraint
components
-
Press <Apply>
-
Review the results
in view 1
-
Press <Ready>
Any pre-described nodal
displacement
will only be used in loadcase 1. For the other loadcases the
pre-described
displacement will be set at zero, which results in a constraint.
3.4
Analyzing
model
When the model is
ready, the
analyses can be performed. Save your model first! When a very large
model
is to be run, it is advisable not to start the analysis from FesaWin,
but
use MatSol instead, as this will run faster. MatSol is a separate
executable
which was included with FesaWin. Search in the directory of FesaWin and
double click MatSol.exe to start.
First the options of
the analysis
have to be set. Within FesaWin do [Analysis,
options..] or within MatSol press <Options>, and select
the
right options. If you are running a simple 2-D analysis set the
analyses
type to 2-D.
When this is done,
press <Run>
in MatSol or do [Analysis, Analysis] in
FesaWin.
3.5
Post-processing
After the
analysis, load
combination can be defined which are constructed from the
previously
defined loadcases. Each load combination can be reviewed graphically or
written into a report file. Loadcombinations can be changed and
modified
without rerunning the analysis.
To look at the
deformed
shape of the model, use [Post-Process,
Displacements]
To review the
stresses
in the construction use one of the stress plot options of Post-Process
menu.
The stress
plots can
be controlled by using [Post-Process,
Options] . Use this form to select which stress component and
from
which elements you want to see the stress plots.
Use [Post-Process,
Report…] to create a numerical report of the input and output
information
of the model.
Use [File,
Print...]
to plot the contents of view 1.
4.0
Element description
4.1
BARD
Two Nodal Axial rod element
Description,
This element is a simple
axial
truss, which can only take load in the direction of the element
definition
line.
Nodes : 2
Local Degrees of freedom :
1
per node
Group Properties,
E modulus
Poisson ratio
Area
Local stress Output,
LSX Stress in local X
direction
Performance,
This is an analytical
element,
which means that the exact solution of the stress and strain relation
is
known and used.
4.2 BEAM
Two
Nodal Beam Bending Element
Description,
This element is a beam
bending
element, which can take load in all degrees of freedom.
Nodes : 2
Local Degrees of freedom :
-
3-D 6 per node
(x,y,z,rx,ry,rz)
-
2-D 3 per node (x,y,rz)
Group Properties,
E modules
Poisson ratio
Area
Rot
Ixx
Wxx
Iyy
Wyy
Izz
Wzz
Note: For 2-D analysis the Ixx, Wxx, Iyy and Wyy
are
not used.
Local stress Output,
LSX Axial Stress in
local
X direction
LSBY Bending
stress around local y-axis
LSBZ Bending
stress around local y-axis
LSXY Bending
stress around local y-axis
LSXZ Bending
stress around local y-axis
Performance,
This is an analytical
element,
which means that the exact solution of the stress and strain relation
is
known and used.
4.3 TRIM
Three
Nodal Membrane Element
Description,
This element is a
displacement
based triangular membrane element with two degrees of freedom per node.
Nodes : 3
Local Degrees of
freedom : 2
per node
Local x
Local y
Group Properties,
E modules
Poisson ratio
Specific mass
Thickness
Plane strain or plane stress
Local stress
Output,
LSX Direct stress in
local X
direction
LSY Direct stress in
local Y
direction
LSXY Shear stress in
local XY
Plane
Performance,
This is not an
analytical element,
which means that an approximate solution of the stress and strain
relation
is used.
The reported local
stresses
are constant over the element surface, which means that the performance
of this element in a coarse mesh is rather poor.
4.4 QUA4D
and QUARD Four Nodal
Membrane
Element
Description,
This element is a
displacement
based quadrilate membrane element with two degrees of freedom per
node.For
rectangular element shapes the QUARD is recommended while for more
irregular
shapes the QUA4D performs better.
Nodes : 4
Local Degrees of
freedom
: 2 per node
Local x
Local y
Group
Properties,
E modules
Poisson ratio
Specific mass
Thickness
Plane strain or
plane
stress
Local stress
Output,
LSX Direct stress
in
local X direction
LSY Direct stress
in
local Y direction
LSZ Direct stress
in
local Z direction (For plane strain only)
LSXY Shear stress
in
local XY Plane
Performance,
This is not an
analytical
element, which means that an approximate solution of the stress and
strain
relation is used.
The reported local
stresses
vary linear over the element surface, which means that the performance
of this element in a coarse mesh is rather better than the TRIM element.
4.5
PLARD Four Nodal Thin plate bending element
Description,
This element is a
displacement
based quadrilate plate bending element with five degrees of freedom per
node. The element behaves very good if
rectangular
shaped however irregular shapes can also be done.
Nodes : 4
Local Degrees of
freedom
: 5 per node
Local x,y z, rx, ry
The local rz
degree
of freedom has been given a dummy stiffens to prevent singularity of
the
stiffness matrix.
Group
Properties,
E modules
Poisson ratio
Thickness
Local stress
Output,
LSX
Membrane stress x-direction (Positive for tension)
LSY
Membrane stress y-direction (Positive for tension)
LSBX
Bending stress around local x-axes (Positive when outer fiber in local
z-direction is in tension
LSBY
Bending stress around local y-axes (Positive when outer fiber in local
z-direction is in tension
LSXY
Shear stress x-y plane
LSTZ
Not reported
Performance,
This is not an
analytical
element, which means that an approximate solution of the stress and
strain
relation is used.
The reported local
stresses
vary linear over the element surface, which means that the performance
of this element in a coarse mesh is rather better than the TRIM element.
4.6
QUARS Four Nodal
Stress
based Membrane Element
Description,
This element is a
stress
based quadrilate membrane element with two degrees of freedom per
node.This
element performs very well even in coarse and irregular shaped meshes.
Nodes : 4
Local Degrees of
freedom
: 2 per node
Local x
Local y
Group
Properties,
E modules
Poisson ratio
Specific mass
Thickness
Plane strain or
plane
stress
Local stress
Output,
LSX Direct stress
in
local X direction
LSY Direct stress
in
local Y direction
LSZ Direct stress
in
local Z direction (For plane strain only)
LSXY Shear stress
in
local XY Plane
Performance,
This is not an
analytical
element, which means that an approximate solution of the stress and
strain
relation is used.
This element has
been
developed based on stress field assumption rather than displacement
field
assumptions. Therefore the behavior of the element is a lot better than
the displacement based elements.
4.7
TPLRS Four Nodal Thick plate bending element
Description,
This element is a
stress
based quadrilate thick plate bending element with five degrees of
freedom
per node. The element behaves very good if
rectangular
shaped however irregular shapes can also be done.
Nodes : 4
Local Degrees of
freedom
: 5 per node
Local x,y z, rx, ry
The local rz
degree
of freedom has been given a dummy stiffens to prevent singularity of
the
stiffness matrix.
Group
Properties,
E modules
Poisson ratio
Thickness
Local stress
Output,
LSX
Membrane stress x-direction (Positive for tension)
LSY
Membrane stress y-direction (Positive for tension)
LSBX
Bending stress around local x-axes (Positive when outer fiber in local
z-direction is in tension
LSBY
Bending stress around local y-axes (Positive when outer fiber in local
z-direction is in tension
LSXY
Shear stress x-y plane
LSYZ
Shear stress y-z plane
LSZX
Shear stress z-x plane
LSTZ
Not reported
4.8
SPRING One node user defined Flexible support
element
Description,
This element is a
spring
support defined by one 6x6 stiffness matrix.
Nodes : 1
Local Degrees of
freedom
: None
Globale degree of
freedom:
Depending on analysis type and used elements see
here
for more information.
Group
Properties,
Stiffness matrix
Local stress
Output,
None

